Wednesday, February 22, 2023

My Beautiful Surroundings


It is great to just take in our surroundings, the nature, the animals, and everything else in life. Today, I am gonna be sharing some of the beautiful scenery I’ve seen and live next to. I will also share my favorite
parts of scenery.

Water in Lakes, Oceans, Rivers, etc

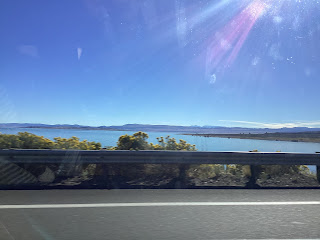
I love water. It is beautiful. When the sun shines on it just right… wow. And when the sun is setting and you get that beautiful orange color. It is just an amazing creation. On family trips I have seen a lot of water in oceans, rivers, streams, but most typically lakes. This picture was taken while we were driving past Mono Lake.


Simple Blue Skies, Mountains, and Plains

This picture is so simple and yet so beautiful. I mean eventually you will get tired of seeing this while you’re driving on the road, but for the first time it is truly beautiful. I love how the sky is so blue and how the top of the mountain has a slight white on it from snow. I love to just sit outside and look at the sky. It is always so blue in summer. I also love looking at the clouds that dot the sky like white polka dots on a blue dress. Then there is mountains. The view from the top of a mountain is amazing, especially when it views a city. But when you are simple looking at a mountain it is so majestic, is it not? Plains can get pretty boring sometimes, but not always. Sometimes they can be covered in plants and beauty. Overall, all the things I listed are beautiful things that are very pleasing to our human eyes.


People

They may not seem like much of surrounding, but people are just as much part of our life like mountains, rivers, animals, or anything else. I love people. Sure, I may be the kid that always hides in a corner during public events, but I enjoy making friends and meeting new people. People are amazing creations of God. Each person is made differently and all of them are amazing. It is wonderful that God has blessed us with so many new people and friends, he truly is amazing. A simple person can change someone’s life just by complementing them or saying hello. Life is made so interesting and fun by all people. Take your friends for example, they might invite you to a party because they’re your friend, they might go skiing with you, or they will just hang out with you. These things make life fun and exciting. That is why people are a beautiful creation and why I am so glad to have them. 


Animals

Aren’t they just so cute?! Whether it’s a little chipmunk, a nut-hunting squirrel, or a furry little kitten, these creatures are magnificent. All of the animals have very different ways of living. An owned cat depends on its owner to take care of it, a squirrel hunts for nuts that it buried somewhere, and a baby bird waits on its mother to get its food until it can get its own. This uniqueness makes animals so special to me. I love the fact that they are different it means that God worked on them just for us. Animals are also incredible to look at. They are either super cute, fierce, strong, furry, or a mix. I especially love corgis (not that other animals aren’t really cute as well). The fact that they are super tiny, how they have heart shaped butts, and how they come in various colors. Everyone has a favorite animal or multiple, and everyone loves them for certain reasons. Animals are a great surrounding.

I hope you now love your surroundings as much as I love mine. There are other surroundings that I didn’t include in here but that is because this post is long enough. I also hope that you now realize the magnificence of everything around.

Wednesday, February 15, 2023

Reminder Owl


This little reminder owl is perfect if you have trouble remembering things and it is just the cutest thing! It is perfect for bedrooms and is customizable in size and color. It is especially great because the reminders are removable!

Supplies: 

Glue stick 

2 pieces of card stock paper (or 1 if you want the wings to be the same color as the body)

Markers

Tape

Sticky notes 

Pencil

Directions:

1. Draw an owl (whatever size) like the one above on 1 of your pieces of card stock paper and cut it out, then draw wings for the owl and cut them out

2. Glue the wings to the back of the owl like the picture at the top of this post

3. Add detail to the owl (by adding a beak, eyes, lines and squiggles, detail to the ears, etc)

4. Grab a stickie note and cover it with tape

5. Stick it on the owls belly 

6. Repeat this steps 4-5 until you are satisfied with the number of stickie notes in the owls belly (the stickie notes can be cut shorter)

7. Now use washable markers to write in the tape-covered stickie notes

8. When you are done with the things you wrote, simple grab a wet towel and wash the writing off!


Thursday, February 2, 2023

Milk Jug Plant Container


Nothing’s better than reusing everyday items (in my opinion). Instead of just throwing simple things like toilet paper rolls, tomato sauce cans, milk jugs, water bottles, etc in the trash why not keep them and turn them into something beautiful instead? With this craft you can do just that!

Supplies:

1 milk jug

Scissors

Anything you can use to decorate this project

Directions:

1. Cut your milk jug in half by using your scissors to poke a hole in the jug, and then cut from there.


2. Scrape of the labels with your fingers or something else good for scraping (or you can, instead of removing the labels, keep them on and cover them with washi tape, markers, etc)

3. Decorate with markers, crayons, pens, or anything else you might have on hand

4. Pour dirt into the jug

5. Plant some seeds and water it daily

6. Watch your plant grow!


Monday, January 16, 2023

T.P. Roll Pen and Pencil Holders


These T.P. Roll Pen and Pencil Holders are perfect for messy desks or you can just use them to hold all your craft supplies. They can support the weight of pens, pencils, markers, scissors, etc. They can also be different lengths if you wanna hold crayons in them! However I’m not just gonna talk about them all day, let’s get to crafting this handy craft.

Supplies:

T.P. Roll

Paper

Markers/colored pencils/crayons

Pin

Glue

Scissors

Directions:

1. Measure a 4 1/2 inch tall and 6 inch wide price of paper

2. Design a cute pattern on it!


3. Glue the paper onto your T.P. Roll


4. Cut a 4 1/2 inch by 4 inch paper and tape it to the bottom


5. Press on the tape to make it secure

6. Pin onto the wall and add pens, markers, pencils, scissors, etc


Monday, January 9, 2023

Dream Catchers


These dream catchers make adorable decoration, and even kids can make them! It only takes a few materials and if you have said materials, is very easy to make. It takes only a matter of minutes before it’s ready to hang.

Supplies:

3 popsicle sticks ( painted or unpainted)

2 long strings

2  craft feathers

3 pompoms 

Glitter glue

Directions:

1. Take your 3 popsicle sticks and glue them together, forming a triangle (let the glue dry before next step)

2. Make it so that your ends of 1 of your yarn strings are touching each other, and put it around the side of the bottom of popsicle stick triangle and tie a knot to keep it secure ( do the same with the other piece of yarn)


3. Take all of the yarn and tie a knot at about the middle

4. Take the strings on the sides and tie 1 feather on each of them

5. With the strings in the middle tie a decorative knot on each

6. Glue pompoms onto the corners of the popsicle triangle

7. Add glitter glue onto the top sides, don’t add glitter glue on the bottom of the triangle, or else the yarn will get wet.

8. Now you can hang it wherever you want!


Friday, January 6, 2023

How to Make Bracelets of All Kinds


Bracelets are my favorite accessory. I love to just cover my arm with them, and today I’m gonna show you how to make some. Bracelets only use a few materials, and are very simple.


Trio Bracelet (Top left)

If you have 2 or 3 friends (or just like this bracelet) then this bracelet is perfect for you. If you have 2 friends than have 2 of the colors represent your friends (by picking out embroidery thread or yarn in their favorite colors or in a color that shows their personality. If you choose personality look at the chart below)

Supplies:

3 long different colored embroidery threads or yarn

Tape

Directions:

1. Once you have picked your 3 strings (representing either your 3 friends or your 2 friends with color or personality) tie an overhand knot at the top of the 3 strings

2. Tape the 3 strings to a book (or any other flat thing)

3. Now braid (by takin the left string and sticking it in the middle and then taking the right string and sticking it in the middle, and so on and so on)

4. Once you have braided it enough to fit your wrist, tie the bottom 

5. Tie the 2 ends together and wear

Washi Tape Bracelet (Top right)

This bracelet is very secure and is even stylish. It is very easy to make and only uses 2 materials! So let’s get started on this washi tape bracelet.

Supplies:

Tape

Washi tape

Directions:

1. Pick out 2 or 3 colors of washi tape

2. Cut a long strip of washi tape and fold them on their sides (so that you have a skinnier, non sticky washi tape strip)

3. Once you have done that, use some washi tape to connect the 3 strips by wrapping it around the top

4. Use actual tape to tape it to a book (or any other flat thing)

5. Braid the 3 washi tape strips together (by taking the left strip and sticking it in the middle and then taking the right strip and sticking it in the middle, and so on and so on)

6. Once you have made it long enough to fit your wrist, use washi tape and wrap it around where the braid ends 

7. Cut off the washi tape that is not braided/ the washi tape at the bottom

8. Take the 2 ends and tape them together with washi tape, and now you can wear it!

Charm Bracelet (Bottom left)

Charm bracelets are simple and fun, but why buy them? This charm bracelet is very simple and very cute, and you can make millions of variations of it to cover your arm!

Supplies:

Scissors

Felt

Beads

Embroidery thread

Needle

Directions:

1. Cut a long enough piece of embroidery thread to fit your wrist

2. Take 1 side of the thread and slide a bead on (it doesn’t have to just be 1 bead, add as many as you like)

3. Cut out a shape with felt (I did a heart, but you can do an animal, flower, etc)

4. Take the other side of your thread and stick it through your needle

5. Poke a hole with the needle through the felt shape and pull the needle through

6. Pull the needle to about the middle of the thread, and then push the needle through the felt shape again, making a stitch (which is the line in the middle of my heart in the picture above)

7. Using the same side of thread add another bead

8. Tie it off and your done!

Wooden Bracelet (Middle of the top)

This bracelet can be decorated however and is the perfect project. It may be a little hard, but it will get easier. So now let’s figure out how to make it.

Supplies:

1 popsicle stick 

Cup about the size of your wrist

Another cup but with a lid (size doesn’t matter)

Water

Markers, pencils, pens, glitter, paint, or whatever!

Directions:

1. Fill the cup with a lid and fill it with water

2. Stick your popsicle stick in the cup and secure the lid

3. Wait 24 hours

4. Grab your other cup and take your popsicle stick out

5. Bend your popsicle stick to fit the cup

6. Once the popsicle stick is in the cup wait another 24 hours

7. Decorate however!

Bead and Knot Bracelet (Bottom right)

This bracelet is adorable! It is especially cute when it pops with color. This bracelet allows you to use all the colors you want. It is super easy to make, even kids can make it!

Supplies:

Beads

Embroidery thread

Needle (does not have to be used)

Tape

Directions:

1. Cut 1 or 2 long pieces of embroidery thread

2. Tie them together with a knot

3. Tape to a book (or any other flat thing)

4. Slip a bead on to the thread

5. Tie an overhand knot

6. Repeat steps 4 and 5 until it fits your wrist

7. Tie an overhand knot at the bottom of the bracelet

8. Tie both ends together with an overhand knot

9. Show off to all your friends!

Bracelet Color Meaning Chart:

Green; Responsible

Orange; Adventurous

Red; Energetic

Blue; Loyal

Purple; Creative

Gray; Smart

Pink; Playful

Yellow; Cheerful

Black; Strong

Brown; Friendly


Sunday, January 1, 2023

Limey Lemonade


Makes: 8 cups of limey lemonade

It’s hot and you're sweating, what to do? Make a refreshing drink, that’s what!

This lemonade is easy to make and is refreshing, it’s sweet but slightly sour, and it’s lemony but limey at the same time! It’s a great drink for kids or adults, and only uses a few ingredients.

Ingredients:

10 1/2 lemons

1 cup of lime juice or 7 1/2 limes

2 cups of sugar

5 cups of water

Directions:

1. Cut your lemons in half and juice them

2. Pour the lemon juice in a pitcher

3. Juice the limes and add to the pitcher, or if you’re using lime juice measure 1 cup and add to the pitcher 

4. Add 2 cups of water to the pitcher 

5. Dump 2 cups of sugar in the pitcher

6. Stir thoroughly 

7. Now enjoy!